Iteration Through the Math Curriculum: Sketchpad Does It Again and Again
Scott SteketeeKCP Technologies, Inc.
Summer 2003
 [This document is a commentary that briefly describes the presentation as it was presented at the 2002 NCTM Annual Meeting in Las Vegas, page by page. The presentation used a Sketchpad file, available here as two separate Sketchpad files: Iteration.gsp and Iteration_After.gsp. The first of these is the sketch as it was when I began the talk, and the second is the sketch with all activities completed. Finally, there was also a handout distributed to attendees at the talk.]
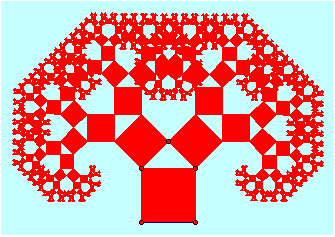
Title: The animation on this page is a Pythagorean fractal tree. Click the Next button in the lower right corner of the sketch to go on to the next page. (Be sure to use the Next button when going from page to page, in order to activate the animation on the page you’re going to.)
Ideas: Iteration is one of the big mathematical ideas that crosses the lines among all the different areas of mathematics. The animation on this page is a spiral formed by rotating and dilating a triangle.
Topics: The presentation provides examples and applications of iteration in each of these topic areas. The animation on this page is a simulation of projectile motion.
Numeric
Numeric iteration is the first topic that we’ll use Sketchpad to explore. The animation on this page is an arithmetic-sequence iteration using Iterate To Depth, so that the depth of the iteration is controlled by an animated parameter.
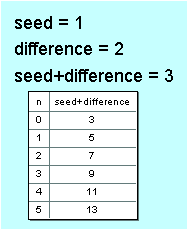
Arithmetic Sequence: Select the seed parameter and iterate it to the seed + difference calculation. Select the resulting table and change the depth of iteration by pressing the + or – keys on the keyboard.
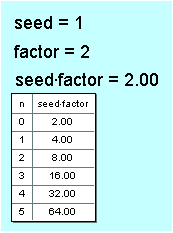
Geometric Sequence: Use the calculator to calculate seed*factor. Then select the seed parameter and iterate it to the seed*factor calculation. Select the resulting table and change the depth of iteration by pressing the + or – keys on the keyboard.
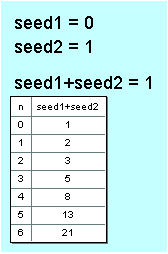
Fibonacci Sequence: Select both seed1 and seed2 parameters and choose Iterate. Map seed1 to seed2, and map seed2 to seed1 + seed2. Select the resulting table and change the depth of iteration by pressing the + or – keys on the keyboard.
Quadratic Sequence: Calculate seed + diff, and also calculate diff + diffs. Select both the seed and the diff parameters and choose Iterate. Map seed to seed + diff, and map diff to diff + diff2. Make sure the resulting table has constant second differences. Select the table and change the depth of iteration by pressing the + or – keys on the keyboard.
Algebraic
In this portion of the presentation, we look at numeric iterations as functions, we use them to plot some graphs, and we discover some interesting results. The animation on this page is the graph of an arithmetic sequence, with a depth that changes.
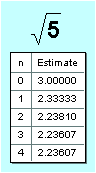 Roots: Few of us now teach the square root algorithm from years ago that some students learned, many students hated, and almost none understood. The Babylonian iterative square root algorithm (which may be almost 4000 years old) makes more sense and is easier to remember. Given a radicand s and a seed x0, we divide the radicand by the seed, and then find the average of the seed and the result of the division. This average is the new seed. Iterate the seed (x0) to the result of the calculation, and increase the number of iterations shown in the table. Investigate how quickly the calculation converges, trying different values for the initial seed and for the radicand. For instance, with the original radicand of 5, try a really bad first guess, in the hundreds or even thousands, and observe the behavior of the iteration. What happens if the initial seed is zero? Be sure to try zero and negative numbers as radicands, and observe the convergence of the result.
Graphing a Sequence: This sketch contains a plotted point at (n, seed). When you iterate n to n + 1 and seed to seed + difference, the result of the iteration is both a table of the values and an iterated image of the plotted point, showing the graph of the value of the sequence as a function of n. Try changing the seed and the difference, and see if you can find a connection with the slope and intercept of the graph.
Graphing the Fibonacci Sequence: Here we'll plot data directly from the table itself. This time we’ll plot the function representing the iteration rule, rather than the function representing the sequence. (In other words, we’ll plot one element of the sequence against the next, rather than plotting each element against the corresponding depth of the iteration.) Iterate seed1 to seed2 and seed2 to seed1 + seed2. Increase the depth of the table to 16 or 18 rows, and select the table and choose Graph | Plot Table Data. (This command is available in Sketchpad release 4.02, available here.) In the dialog, set x to seed1 + seed2, and set yto seed2 + (seed1 + seed2) and click Plot. When the points appear, verify that the first few points are at (2, 3), (3, 5), and so forth. Then rescale the coordinate system (by dragging one of the numbers on the x-axis) until you can see all the points. Notice that the pattern, at large scales, appears to be linear. Determine the slope by constructing a line through the last two points and measuring the slope. Compare the resulting slope with the golden ratio (in the bottom right corner of the sketch). Figuring out why the ratio of successive terms of the Fibonacci sequence is the golden ratio is left as an exercise for the reader.
Geometric
In this portion of the presentation, we look at several geometric applications of iteration. The animation on this page is one step in a parallelogram tessellation of the plane.
 Regular Polygons: This sketch uses iteration to construct first a regular pentagon and then a more general polygon.
For the pentagon, we've already constructed segment AB and rotated the segment and point B by 108º around point A. To iterate, select A and B, and map A->B' and B->A. The default number of iterations is three—just enough to complete the pentagon.
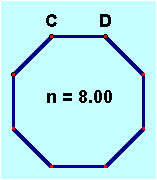
For the more general polygon, we’ve already constructed segment CD and parameter n (using New Parameter on the Graph menu) and we've set the value of n to 8. In addition, we’ve calculated the exterior angle for a polygon with n sides.
Before you iterate to construct the polygon, you must first use the pre-image (segment CD) to create the first image. Translate C by the vector D->C, mark the calculated angle (using the Transform menu), and then rotate the new point C' by the calculated angle. Hide the translated point, so you have only segment CD and the next vertex C''.
Iterate this construction to a depth determined by parameter n. (The value of n is 8 at the moment, but n, and the desired depth, may change in the future.) To do so, select the two pre-image points C and D and the parameter n. While holding down the Shift key, choose Iterate To Depth from the Transform menu, and iterate D->C and C->C''. Click Iterate to finalize the iteration; the result should be an octagon. Now select parameter nand use the + or - keys on the keyboard to change the parameter, and hence the number of sides of the polygon.
Challenge: Construct a similar iterated regular polygon, but with the two pre-image points determining the center and one vertex rather than two vertices.
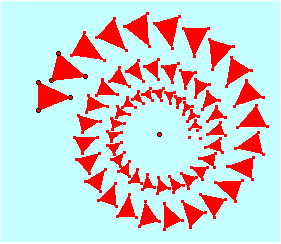 Spiral: This sketch has a triangle seed (pre-image) and a rotated, dilated image of the triangle, with the point angle determining the angle of rotation and the point ratio determining the scale factor used for dilation. Iterate the three vertices of the seed triangle to the three vertices of the image triangle, and then use Properties to change the depth of the iteration to 200. Drag points angle and ratio to modify the spiral.
Tiling: This sketch has a seed consisting of four parallelograms, constructed using translations B->A and B->C. (We start with four, rather than one, to establish a pattern of alternating colors. If we used only a single parallelogram as the pre-image, all the images would be the same color.) For the iteration, select the original three points A, B, and C and choose Iterate. Map A->A'', B->A', and C->D for the horizontal iteration. But to tile the plane we must also iterate vertically. This requires a second iteration map: from the Structure menu of the Iteration dialog choose Add New Map. For the second map, iterate A->E, B->C', and C->C''. When both maps are set properly, click Iterate, and use the + and – keys to change the depth of the iteration.
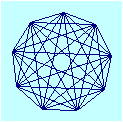 Complete Graphs: Graph theory involves the concepts of nodes and edges, and is not directly related to the process of graphing data or functions. In this diagram a node is represented as a point and an edge as a segment. In a complete graph, there’s an edge connecting every possible pair of nodes. Move the point Drag Me to change the number of nodes. Note that at every depth, the sketch shows an edge connecting every possible pair of nodes. (Thanks to Keith Dean for this sketch.)
Fractal
In this portion of the presentation, we look at four examples of fractals and chaos produced by iteration.
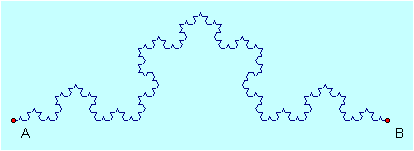
Koch Curve: This fractal starts with a segment, trisects it, and constructs an equilateral triangle on the middle third. It then forms a fractal by recursively applying the same construction to each of the four resulting segments.
Click the first two buttons (Show Trisection and Show Triangle) to show these preparatory steps. Now select points A and B, and choose Iterate. For the first map, iterate A->A and B->C. From the Iterate dialog's Structure menu, choose Add New Map and map A->C and B->D. Add another map and map A->D and B->E. Finally, add a fourth map and map A->E and B->B. Before you click Iterate, choose Final Iteration Only from the dialog’s Display menu. After you iterate, click the Hide Pre-image button to see the result more clearly.
You can click the Show Table button to show the length of the Koch curve for various iteration depths, based on a value of 1.00 for the original segment. What can you say about the length of the Koch curve as the number of iterations increases?
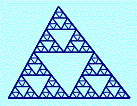 Sierpinski Triangle: This fractal starts with a triangle, and then recursively duplicates that triangle in each of the three corners of the original triangle.
Select points A, B, and C, and then Iterate. For the first map, duplicate the triangle to the top corner by iterating A->F, B->B, and C->D. From the Iterate dialog’s Structure menu, choose Add New Map and duplicate the triangle to the bottom left corner. Finally add a third map and duplicate it to the bottom right corner.
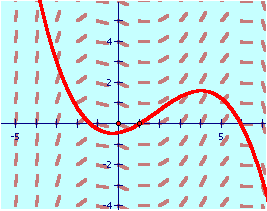
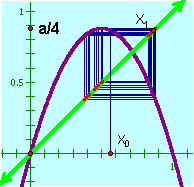 Logistic Function: This function, f(x) = a · x (1 - x), can be used to model the behavior of a population that grows in proportion to the existing population (the a · x factor) but is limited in some way, perhaps by availability of food (the 1 – x factor). In this sketch x0 represents the seed population, and x1 is the population one generation later. (Note how the line y = x is used geometrically to convert the result of the function, f(x0), to an x value, x1.) To iterate this function over multiple generations, iterate X0-> X1, and then use Properties to set the iteration depth to 500 or so. You can drag X0 back and forth to change the original seed, and observe to what extent long-term trends are sensitive to the initial seed. Leaving the value of a at 0.70, what is the long-term trend of the population? Now move the point a/4 to 0.5, changing a to 2.0: what’s the long-term result now? Finally, observe the long-term behavior of the population for values of a between 3.0 and 4.0. For instance, look at the long-term behavior for a = 3.20. (Tip: it alternates between 0.51 and 0.80 at each generation.) What happens at 3.50?
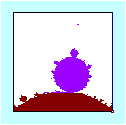 Mandelbrot Set: This sketch uses iteration to look at a small portion of the Mandelbrot set, a wonderfully interesting set of complex numbers typically represented as points on the complex plane. In the existing configuration, we’re looking at the portion of the plane containing numbers with a real part between -0.06 and -0.19 and with an imaginary part between 0.81 and 0.94. The set contains only those points for which the iterated value of the function Zi = Zi-12+ Z0 is bounded.
For each point in the chosen region, this sketch iterates the function to a depth of 50. This gives a pretty good idea of the shape of the set, but a deeper iteration (to a depth of 100 or even more) would give considerably more accurate results. But be careful if you change the depth of the iteration; even 50 iterations, for all the points in the region, can take a long time to calculate.
Calculus
In this portion of the presentation, we look at four examples in which iteration is used in calculus.
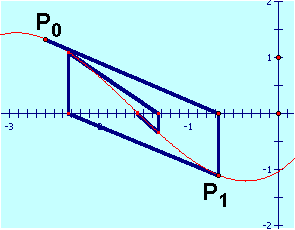 Newton's Method: Newton's method for finding the root of a differentiable function involves taking an initial guess or seed, and calculating both the value of the function and the value of the derivative. These results are used to construct the tangent to the function, and the intersection of that tangent with the y-axis becomes the next guess, the next value in the iteration. Iterate P0 to P1, and increase the number of iterations to 10 or so. Now let’s use this construction to investigate the stability of Newton’s method for various seeds. Move P0 to different positions on the x-axis, and as you drag observe to which root the method converges. Can you find places where the method is unstable, that is, where small changes in the seed result in large changes in the result?
Antiderivative: The probe used in this sketch is constructed to show the slope of the antiderivative at any position on the plane. (To construct such a probe, you translate the initial point at such an angle that the slope of the resulting segment matches the value of the function. Explain why such a probe shows the slope of the antiderivative.)
1. After showing the probe, make sure that Snap Points (on the Graph menu) is turned on, and then drag P around the plane. Note how the traces left behind show the slope field of the antiderivative.
2. Turn off Snap Points, and use Undo to return the probe to its initial position. Drag Point P in the direction of the probe in order to actually trace out the antiderivative. The trace you leave behind shows the shape of the function. You may need to try this several times (using Erase Traces between tries) to get a trace you’re happy with.
3. Undo again to return P to its original position, and this time automate the dragging of P in the direction of the probe: Select P and the far endpoint of the probe, and choose Action Buttons | Movement from the Edit menu. Use the resulting Move button to automatically move P in the direction of the probe. How does the result compare with your effort to do it by hand?
4. You can use iteration to make an antiderivative that’s an actual Sketchpad object, so that you can move the initial point, or even change the function, and the antiderivative will reflect the changes. Select P, and choose Iterate from the Transform menu. Iterate P to the endpoint of the probe. When the iteration appears, change the number of iterations to 1000. Notice that the h slider in the sketch controls the length of the probe (and therefore the length of each iterated step). Slide h so the steps are very large, and observe the effect on the approximation of the antiderivative. Make h very small; what happens to the iterated image? What would you like to claim about the shape of the iteration (and the accuracy of the approximation) as h approaches zero?
Taylor Series: This sketch shows how an iteration of polynomial functions, starting with f(x) = x, can be used to approximate the sine curve. Change the number of terms parameter to determine the depth of the iteration. Use the buttons to see the actual polynomial functions being used to construct the approximation.
Modeling
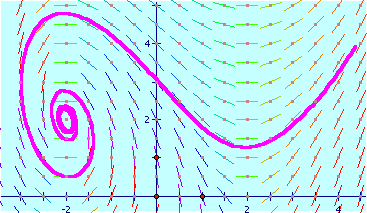
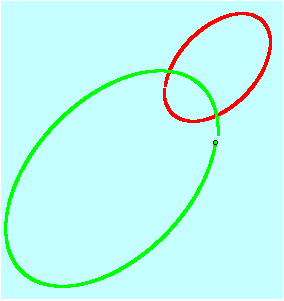
In the concluding portion of the presentation, we look at two examples in which iteration is used in modeling, specifically in modeling of motion. (The example on this page shows a binary star system in which the green and red stars rotate about each other. The red star has twice the mass of the green one.)
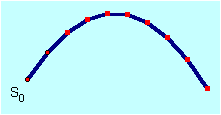 Projectile Motion: This sketch can be used to investigate the behavior of a projectile in a constant gravitational field. It shows an initial velocity vector V0 for a projectile, and a vector representing the acceleration of gravity. Press the Adjust Position button to translate the initial position S0 by the current velocity, and press the Adjust Velocity button to adjust the initial velocity vector V0 by the effect of gravity. Now select both S0 and V0, and iterate each to the point that represents its new vector. Increase the number of iterations, so you can observe the entire flight path of the projectile. Experiment with different seeds (positions of S0 and V0), and experiment with different gravity vectors.
 |
 |
To construct the model, we first need to use the laws of motion to calculate the new position of the satellite after a single time interval. To do so, follow these steps:
1. Press the Show Acceleration button to show the acceleration, which is calculated from Newton’s Law based on the distance of the satellite from the earth. (The value GM in the sketch represents the product of the gravitational constant times the mass of the earth. For the simulation, we use rather different values from the actual physical values of these constants.) Drag the satellite to different positions to verify that the acceleration vector behaves as expected, always pointing in the direction from the satellite toward the earth, and becoming weaker the farther away the satellite is from the earth.
2. To calculate the change in velocity during one time interval, we must multiply the acceleration by the length of the time interval: ?v = a * ?t. Click the Scale Acceleration button to multiply the acceleration by the time interval.
3. Press the Adjust Velocity button to add the velocity adjustment ?v to the original velocity, producing an adjusted velocity. This button also shows a point midway between, representing the average velocity during the time interval.
4. To calculate the change in position during one time interval, we must multiply the average velocity by the length of the time interval: ?s = v * ?t. Click the Scale Velocity button to multiply the average velocity by the time interval.
5. To apply the change in position to the satellite, click the Move Satellite button. We've now found the new position of the satellite after a single time interval.
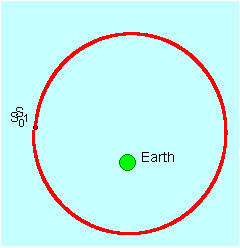
To model the orbital motion of the satellite, we need to do this calculation again and again. Select S0 and V0, and iterate S0 to the new satellite position S1 and V0 to the new velocity V1. Increase the number of iterations to 1000 or so, and observe the shape of the calculated orbit.
The accuracy of the result is strongly affected by the size of the steps (?t, or time in the sketch) used in performing the calculation. What changes do you observe as you make time smaller? Try values like 0.2, 0.1, 0.05, and so forth. If you make the time too small, you won’t have enough iterations to complete a full orbit, so you may have to increase the number of iterations.
Try different seed values for S0 and V0. Observe what happens if the satellite starts from different positions relative to the earth, and observe how the orbit differs according to the starting velocity. Can you make an orbit that’s nearly circular? What happens when the starting position is far from the earth? Near the earth? How can you tell when the calculations are more or less accurate? When you find a starting configuration that you believe results in inaccurate calculations, decrease the time interval (let ?t approach zero) and see if the results become more accurate.
How would you calculate the period of a particular orbit? (Hint: think about the value of ?t and the number of iterations.)